
21 DIY Roadside Farm Stand Ideas That Save You $600
Building a commercial grade market structure from local contractors costs over seven hundred dollars. Creating a functional roadside presence yourself requires less than one hundred dollars in basic lumber and recycled materials. Every neighbor wants fresh eggs or seasonal produce delivered right to their driveway. You turn a tiny corner of your property into a consistent income source without needing a business loan. Simple pine boards and salvaged pallet wood produce a professional finish that draws passing traffic. Selling your excess garden harvest covers the entire build cost in one weekend. You keep the profits while providing a charming service to your local community.
Retail kits sell for eight hundred dollars because they capitalize on the dream of a rustic country lifestyle. Most buyers overpay for pre-built units that lack the personality of a truly custom stand. We focus on low cost structural integrity using standard hardware store materials. This setup turns raw timber into a high end display piece that resists weather and theft. You avoid the traps of expensive roofing and complex joinery that ruin many weekend projects. Everything here relies on basic tools and common sense construction to guarantee a quick return on your small investment.
1. Pressure Treated Pine Bases

Wood rots quickly when it sits directly on damp soil near a ditch. Building your frame on a pressure treated four by four base prevents expensive moisture damage for years. A standard treated post costs twelve dollars and keeps your entire stand from sinking into the mud. Beginners often place untreated wood directly on the ground and watch it disintegrate by the first frost. Investing fifteen dollars in heavy duty gravel or crushed stone for the base adds another layer of protection. This structural foundation costs peanuts compared to rebuilding your stand every single season.
2. Pallet Wood Siding

Buying new cedar siding for a small stand adds two hundred dollars to your material list. Scavenging heat treated shipping pallets from local industrial parks costs exactly zero dollars. You pry the boards off carefully with a crowbar and nail them to your pine frame for a rustic textured finish. Ensure you look for the HT stamp to avoid chemical contamination from imported wood. Some scavengers grab flimsy plywood instead of solid wood and regret it when the rain warps the material. You achieve a high end farmhouse look without spending a dime on exterior cladding.
3. Corrugated Metal Roofing

Shingles require expensive plywood underlayment and professional installation expertise. Corrugated galvanized steel panels cost fifteen dollars at a local hardware store and provide instant leak proof coverage. You screw the panels directly into your rafters for an industrial look that screams fresh produce. Skipping the rubber washer screws leads to water leaking inside and ruining your wooden shelves. Spend ten dollars on a pack of roofing screws to seal the metal panels tight. This cheap metallic roof reflects intense summer heat and keeps your vegetables crisp during long July afternoons.
4. Chalkboard Paint Signage

Large professional vinyl signs cost nearly one hundred dollars at print shops. A fifteen dollar quart of chalkboard paint turns any scrap board into a versatile daily menu. You update your inventory and prices instantly without paying a designer or a sign maker. Many stands use markers that wash away in the first light drizzle of rain. Purchasing a pack of liquid chalk pens ensures your prices stay visible even during heavy morning dew. This flexible signage lets you switch from spring flowers to autumn pumpkins without buying a single new sign.
5. Recycled Produce Crates

Custom shelving requires precise cutting and expensive finish carpentry. Stacking vintage wooden crates inside your stand provides instant organizational displays for zero dollars. You find these at local orchards or flea markets for five dollars a piece. Beginners often nail the crates down permanently but fixing them with zip ties allows for better cleaning. A dirty stand repels customers immediately so being able to pull the crates out for a quick hose down is a huge advantage. You create a professional market vibe that looks like a high end boutique bakery stand.
6. Bicycle Wheel Wheels

Moving a heavy wooden stand to the best sunny spot requires serious physical labor. Salvaging two old bicycle wheels from a local thrift store turns your frame into a portable farmers market stand for ten dollars. You bolt the axle to one side of the frame and use a simple kickstand for stability. The worst mistake involves using plastic wheels that crack under the weight of heavy vegetables. Steel rims from an old mountain bike support hundreds of pounds easily. This portability allows you to chase the foot traffic based on the time of day.
7. Hanging Flower Baskets

Visual height draws eyes from passing cars much better than flat counters. Hanging cheap metal baskets with wire hooks creates an instant vertical display for twelve dollars. You fill them with colorful blooms to announce that your stand is open for business. Some stands place the flowers too low and block the view of the actual food for sale. Hanging them high above the counter clears the sightline while adding massive curb appeal. These low cost accents turn a simple box into a must visit local destination for neighbors.
8. Solar Powered String Lights

Hardwiring electrical power to a roadside location requires costly permits and a professional electrician. Solar powered LED light strands cost twenty dollars and turn your stand into a glowing beacon at dusk. You drape the lights around the roofline and let the sun charge them all day long. Cheap plastic bulbs often leak and short out during the first summer storm. Buying IP65 rated waterproof lights prevents an expensive replacement within the first month. These lights add a cozy charm that keeps customers coming back long after sunset.
9. Hinge Down Serving Counter

Permanent counters block the walkway and make the stand feel cramped. Attaching a wide board with heavy duty gate hinges creates a folding counter for fifteen dollars. You prop it up during open hours and lock it flat against the siding when you close for the night. Skipping the locking mechanism allows the counter to bounce and bang during high winds. A simple hook and eye latch secures the shelf tightly and prevents unnecessary noise. This smart design maximizes your workspace while keeping the exterior footprint tiny.
10. Clear Plastic Tarp Windows

Protecting your harvest from rain usually involves moving everything inside. Stretching heavy duty clear vinyl sheeting over your windows creates a weatherproof display for twenty dollars. You attach it with simple wood furring strips and brass screws. Some beginners use cheap painters plastic that shreds in the first gust of wind. Choosing twelve mil thick vinyl ensures your display remains clear and sturdy all season long. You get a glass storefront feel without the massive cost or weight of real tempered window panes.
11. Built In Money Box

Storing your cash in an open jar on the counter invites theft and weather damage. Installing a small locking metal mailbox on the side of the structure costs twenty dollars and keeps your earnings secure. You secure it with heavy duty screws that are impossible to remove from the outside. Leaving the key in the lock or using a flimsy box leads to avoidable losses. This simple safety feature provides peace of mind while you are away from the stand working in the garden. You build trust with customers who know their money stays safe.
12. Repurposed Window Shutters

Side walls are boring when they are just flat pieces of plywood. Attaching vintage wooden shutters to the sides of your frame adds architectural detail for fifteen dollars. You find them at neighborhood garage sales and give them a quick coat of bright exterior paint. People often mount the shutters crooked which makes the whole structure look unstable. Using a basic level ensures your vintage accents look intentional and charming. These salvaged pieces provide the rustic farm stand design aesthetic that drives Pinterest traffic and local attention.
13. Deep Storage Bench

Keeping backstock produce nearby saves you from running back and forth to the house. Building a hinged lid bench along the back wall costs thirty dollars in lumber and hardware. You store extra crates and your display signs safely inside when the stand is closed. Beginners often skip the drainage holes in the bench floor which leads to moldy wood. Drilling a few quarter inch holes allows condensation to escape and protects your inventory. This interior storage area doubles as a sturdy work table for sorting your harvest.
14. Burlap Canopy Valance
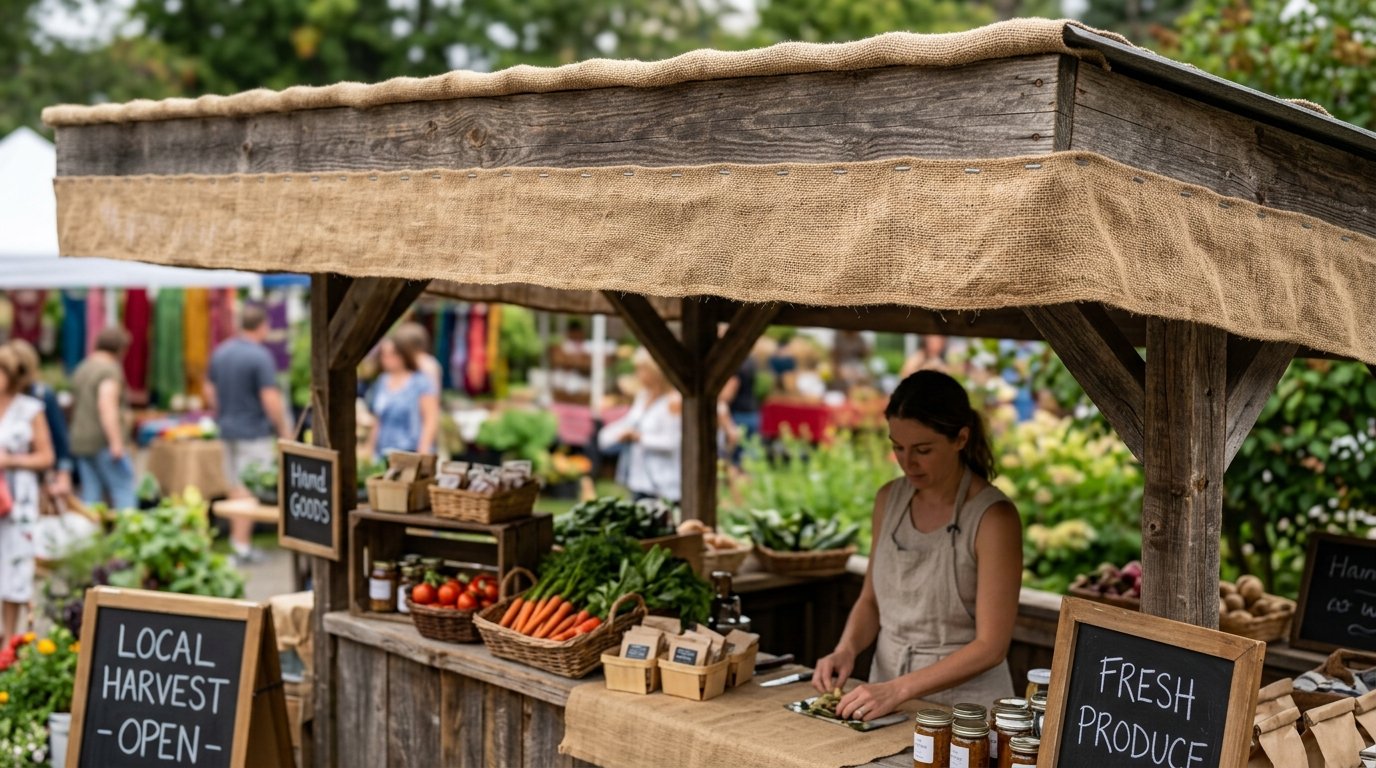
A plain wood edge looks unfinished and lacks that professional market style. Stapling a thick burlap strip along the roof edge costs five dollars and softens the overall look. You fold the raw edge over twice to prevent fraying and staple it every three inches. Some stands use cheap synthetic fabric that fades to a weird gray color after one month in the sun. Natural jute burlap weathers beautifully and reinforces that classic garden aesthetic. This simple detail separates a rough tool shed from a beautiful vegetable stand.
15. Sturdy Ground Anchors

High winds can flip a lightweight wooden structure in seconds. Driving four heavy duty rebar stakes into the ground and chaining them to the frame costs ten dollars total. You sink the stakes two feet deep for maximum holding power. Skipping the anchoring step is a massive mistake that results in a destroyed structure and wasted lumber. You sleep much better during thunderstorm season knowing your stand is pinned down firmly. This minor investment protects your entire time and money investment from being blown across the property.
16. Hanging Scale Setup

Customers feel much more confident when they can weigh their own produce. Hanging a vintage metal balance scale from a sturdy rafter hook costs twenty dollars at antique shops. You mount it securely into a main structural beam to prevent it from pulling loose. Many people buy cheap digital scales that fail when the battery dies or they get damp. An analog metal scale never loses power and adds a wonderful nostalgic feel. This simple tool adds value to your stand and helps your customers feel comfortable shopping solo.
17. Mesh Screen Ventilation

Vegetables wilt instantly in a stagnant hot box. Replacing a solid side panel with framed hardware cloth screen costs ten dollars and keeps the airflow moving. You staple the wire mesh securely to the inside of the frame. Some stands use light window screen that rips when a cat or raccoon touches it. Heavy duty steel mesh keeps out the pests while letting the breeze keep your onions and peppers fresh. Good ventilation doubles the shelf life of your harvest and saves you from discarding spoiled produce.
18. Hanging Vegetable Bundles

Flat counters fill up very fast and limit your total inventory. Hanging bundles of herbs or garlic from the rafters utilizes wasted vertical space for free. You use simple garden twine and screw hooks to suspend the produce securely. Beginners often hang the bundles too low which creates a hazard for tall customers walking through. Keeping everything above head height maximizes your floor space and keeps the display clean. This display trick adds visual layers and makes the stand feel like a bountiful country kitchen.
19. Magnetic Tool Strip
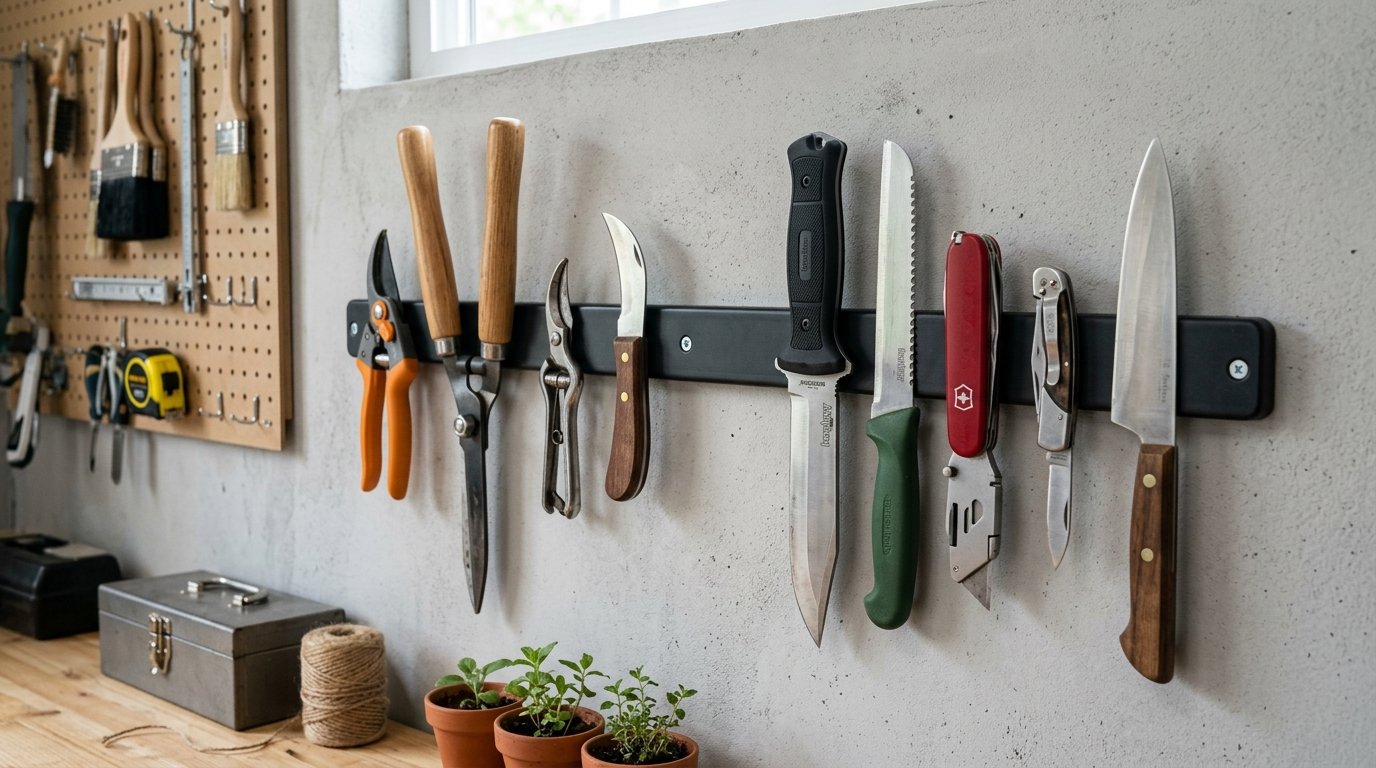
You always need a knife or a pair of scissors to trim your harvest while working. Attaching a long magnetic strip to the inner wall costs twelve dollars and keeps your tools within reach. You mount it firmly to the wooden studs so it never wiggles or falls off. Some people use cheap weak magnets that let the tools slide off during vibration. A high quality neodymium magnetic strip holds heavy garden shears tightly in place. This organized approach keeps your stand looking clean and professional at all times.
20. Removable Canvas Awning

A permanent roof extension can block too much light for your inside displays. Building a removable awning with metal poles costs thirty dollars and shades the front counter perfectly. You slide the poles into floor sleeves when the sun gets too bright in the afternoon. Choosing a thin white fabric allows soft light to filter through without burning your delicate flowers. Some people forget to take the awning down at night and it catches the wind like a sail. A quick release system lets you pull it down in ten seconds flat.
21. Annual Wood Staining

The sun and rain destroy unprotected pine in less than two years. Applying a fresh coat of quality exterior stain every spring costs twenty dollars and adds five years to your stand life. You wash the wood first to remove dirt and mold before brushing on the sealer. Many owners skip this step and watch the structure turn gray and brittle by autumn. Taking one hour every spring to coat the wood maintains your investment for pennies compared to building it again. This small ritual keeps your curb appeal high and your maintenance costs effectively at zero.
Frequently Asked Questions
Is a diy roadside farm stand worth the construction effort
Building a small stand pays for itself in just one weekend of successful sales. You gain a permanent asset that keeps your extra vegetables moving instead of rotting in the garden. The community interaction and extra cash make it a rewarding project for any home gardener.
What are the cheapest materials for farm stand design
Salvaged pallet wood and corrugated metal panels are the absolute lowest cost options available. You can usually find the wood for free on local marketplaces or from warehouses. Metal panels cost only fifteen dollars each at any big box hardware store.
How to build a small farm stand that is secure from theft
Installing a lockable metal mailbox on the side of the stand keeps your cash safe while you are away. Securing the structure to the ground with deep rebar anchors also makes it impossible to load into a truck. Most thieves move on when they see a secured cash box and anchored frame.
Are mobile farmstand setups better than permanent ones
Portability allows you to move your stand to the sun or the best roadside visibility spot. Using old bicycle wheels creates a cheap mobile unit that you can tuck into the garage every single night. Permanent structures are better if you have high volume traffic and want to anchor it securely.
How to build a vegetable stand on wheels without heavy equipment
You mount two bicycle wheels on one side of a pine frame and use a simple kickstand. The entire frame rests on the ground until you lift one side and roll it to the new location. This clever mechanical design requires no expensive machinery to construct.
Do i need a business license for a front yard bakery stand
Local laws vary wildly depending on your specific county and municipality. You must check your local zoning office before setting up any permanent structure. Most residential areas allow small vegetable stands but baked goods often require a certified kitchen inspection.
What are the best farm stand inspo resources for beginners
Pinterest remains the absolute king for visual design ideas and organizational tips. Searching for rustic farm stand designs will give you hundreds of free layout examples. You can save the best designs to your own inspiration board to build your material list.
How to keep produce fresh in a roadside veggie stand diy
The secret is maximum ventilation and constant shade. You build the stand with wire mesh sides to keep the air flowing freely through the shelves. Keep the sun away from your delicate tomatoes by adding a wide canvas awning to the roof.
Can i build a diy egg stand roadside for neighborhood sales
Egg stands are incredibly popular because they require no electricity and little space. You build a simple wooden box with a lid to keep the cartons cool and dry. Adding a sign with your prices helps you sell out of fresh eggs every single morning.
How to build a vegetable stand that looks high end
The key lies in the finishing details like chalk paint signs and neat hanging flower baskets. You paint the wood a clean white or a soft earth tone to keep it looking polished. Organizing your inventory into neat wooden crates makes the whole stand look like a professional market.
Is pallet wood farm stand safe for storing food
Yes, as long as you check the pallets for the HT or Heat Treated stamp. Avoid any pallets that have chemical stains or the blue color that signifies chemical treatment. When in doubt, you avoid the pallet and buy clean pine boards from the lumber yard.
How much does a basic farm stand cost to build
A very simple stand costs roughly one hundred dollars in raw materials like pine and screws. You save hundreds more by scavenging your own exterior siding and using recycled crates. Sourcing materials from your own scrap pile can lower the cost to nearly zero.
Maximizing Your Seasonal Profit Margins
Selling your extra garden harvest turns your backyard hobby into a legitimate income stream. Many gardeners fail because they do not curate the display to match the season. You sell high demand tomatoes and peppers in August but switch to hardy squash in October. Keeping your signs updated with the chalkboard paint method alerts locals to the fresh items. Using the folding counter keeps the footprint small which helps you stay within residential zoning limits. Spending an hour a week cleaning the crates and refreshing the flower baskets creates a premium brand feel. People pay more for produce that looks loved and handled with care. You optimize your prices by offering bundles rather than individual items. This professional touch builds a local reputation that keeps your inventory moving out the door as fast as you can pick it.
Watching the stand empty out every single day is an incredibly satisfying experience for any grower. You turned some scrap wood and a few bags of screws into a thriving community market hub. These twenty one building tips keep your project budget low while ensuring your roadside display looks amazing. Save this roadside farm stand guide to your favorite outdoor living board today to start your planning phase. Choose one affordable design idea to begin your construction this weekend. Share these savings tricks with a neighbor who loves growing too much produce. I have seen tiny stands like these turn hundreds of dollars in garden waste into a profitable yearly venture.
The Secret To Weathering Roadside Structures
You must seal every single piece of exposed wood if you want this stand to last more than one summer. Roadside structures sit in the direct sun and heavy rain for months without any protection. Skipping the waterproofing step results in a rotting structure that nobody wants to visit. Apply a high quality exterior penetrating sealer to all surfaces before you build. You focus especially on the ends of the boards where water wicks into the grain and causes deep rot. Spending forty dollars on a gallon of deck sealer effectively doubles the lifespan of your entire market stand. You brush it on liberally and let it dry for twenty four hours before assembling the siding. Taking this extra afternoon of work saves you from a total reconstruction two years from now.

Jason Lee blends real-world budgeting experience with creative savings strategies shaped by his background in community outreach and financial education. He specializes in building practical systems—like zero-based budgets, sinking funds, and spending trackers—that regular families can actually stick with month after month. At Dollar Pioneer, Jason focuses on user-friendly guides, printables, and templates that make smart money management more accessible, less intimidating, and easier to turn into a weekly habit.